Physical Address
304 North Cardinal St.
Dorchester Center, MA 02124
Physical Address
304 North Cardinal St.
Dorchester Center, MA 02124
Belts are a daily essential, yet not always a perfect fit. Making hole adjustments can be necessary for comfort and style. Customizing your belt ensures it fits just right, matching various outfits and waistline changes. A belt with proper holes also enhances durability, preventing overstretching.
Whether you’ve gained or lost weight, or have a variety of pants that sit differently, properly spacing new holes maintains a clean, professional look. The process can be simple with the right tools and techniques. Pair that with a bit of patience and you’ll achieve results that seem professionally done. When adjusting your pants, remember that the same attention to detail applies when selecting graduation belt buckles; both require careful consideration to ensure a polished and professional appearance on your special day.
By learning how to add holes to your belt, you become self-sufficient, saving time and money on modifications or replacements. Following the methods outlined will guide you through crafting a customized, comfortable, and stylish belt. Let’s explore the tools and techniques to achieve a perfect fit for your belt.
To make a new hole in your belt, certain tools will ensure precision and ease. Here are the basics you might need:
As you consider these tools, remember that the goal is to create a neat, robust hole that matches the existing ones. Carefully select the tool that you feel most comfortable using and fits the resources available to you. These tools not only help you in making holes in belts but can be useful for many other DIY projects.
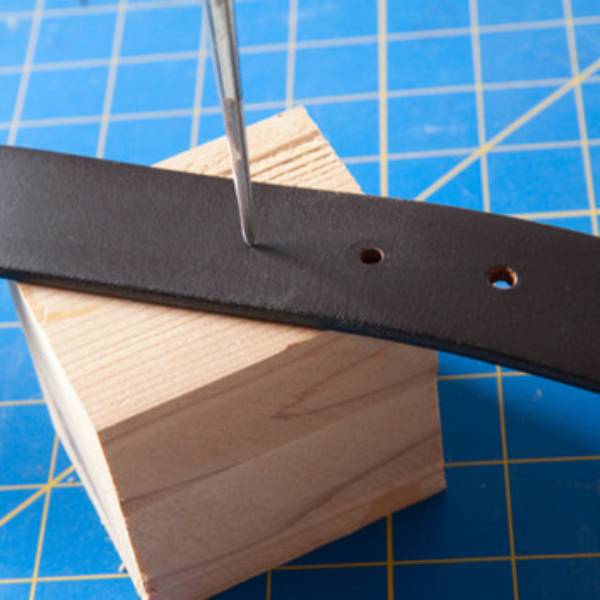
Before adding a new hole to your belt, precise measurements and markings are essential for a professional result. Begin by laying the belt flat on a sturdy surface to ensure accuracy.
With careful measurements and clear markings, you’re now set to create a new hole that blends seamlessly with the existing design of your belt. The right start will make the rest of the process smooth and stress-free.
Creating precise holes in a belt is vital for a clean look and longevity.
A rotary punch is the perfect tool for this task.
Not all punches are equal – Tandy Leather offers excellent choices.
Select the right-size punch tube, position it on the mark, and simply squeeze.
A #5 punch tube often works best, matching most belt buckles.
Ensure you choose a size that corresponds to your buckle’s tongue.
Stability is key – secure your belt firmly, center the punch, and apply pressure.
This method is ideal for consistent, rounded holes that enhance the belt’s strength.
With a rotary punch, you can add holes quickly and without much effort.
A rotary punch might be a wise investment if you frequently adjust belts.
It’s a straightforward process that yields professional results every time.
In summary, for precise, clean holes, the rotary punch is your go-to tool.
Making a new hole with a round drive punch and mallet is simple. You need the right size punch tube and a heavy-duty mallet or hammer. Tandy Leather has suitable tools for this task. Choose a punch that matches your belt’s hole size, often a 3/16″ is standard.
First, place your belt on a hard, flat surface. Put a cutting board underneath to avoid damage. Align the punch on the mark you made. Strike it firmly with the mallet. This method requires some strength and patience. But it results in a clean, round hole. It’s perfect for thicker belts or when you need precision. Remember to aim carefully and hit strongly for a single clean cut. When crafting your Lucchese belt, ensure you follow the proper technique to create a clean hole by using a mallet and punch, allowing for precise adjustments that enhance its durability and style.
This is a reliable way to add holes to a belt. It may take longer than using a rotary punch. But you have control over the force and positioning. Be patient and precise, and you’ll create a hole that looks original to the belt.
Drilling holes into a belt at home can be easy. To do this, you will need a power drill and the right bit size. Usually, a 3/16″ bit is a good choice for standard belts.
Before you begin, secure your belt. Place it on a piece of scrap wood. This keeps your drill bit from damaging surfaces.
Mark the spot for your new hole carefully. Align it with the existing holes for a uniform look.
When ready, hold the drill steady. Start with a slow speed. Gradually increase as you go through the leather. Be extra careful to prevent the belt from spinning or moving.
Remember, the drill should go straight through. This ensures the hole is clean and the right size. Pull the drill out once you’re through and clean any debris.
Drilling offers a quick, clean hole if done properly. With patience and precision, the result can seem like a factory-made hole.
Sometimes, you don’t have specialized tools. But you can make do with items around your house.
Remember, these methods need a steady hand and care. They are not as precise as punches or drills. But they can work well when you’re in a pinch.
Make sure the tool you use is sharp. This will help you punch through the leather smoothly.
Round out the hole with a knife after the initial puncture. This strengthens the hole.
Be patient and take your time. This helps avoid mistakes and results in a clean hole.
Protect surfaces by working over scrap wood. It’s better for safety and prevents damage.
Puncturing holes with household items is a handy skill. It’s useful when you need a quick fix. With the right approach, you can still make a neat looking belt hole.
Using an awl or nail is a handy way to add holes to your belt. This method is ideal when professional tools are not available. It offers a quick fix and can be done with common household items.
The awl or nail technique is a simple solution for when you’re in a bind. It’s less precise than a punch or drill, but it works well for a quick fix. Be cautious and take your time to ensure the best result. Remember, neatness counts, even when you’re using basic tools. Keep safety in mind and protect your work area with scrap wood. When it comes to attaching Molly’s belt buckles, using the awl or nail technique can provide a quick and effective solution, just remember to prioritize safety and neatness for the best outcome.
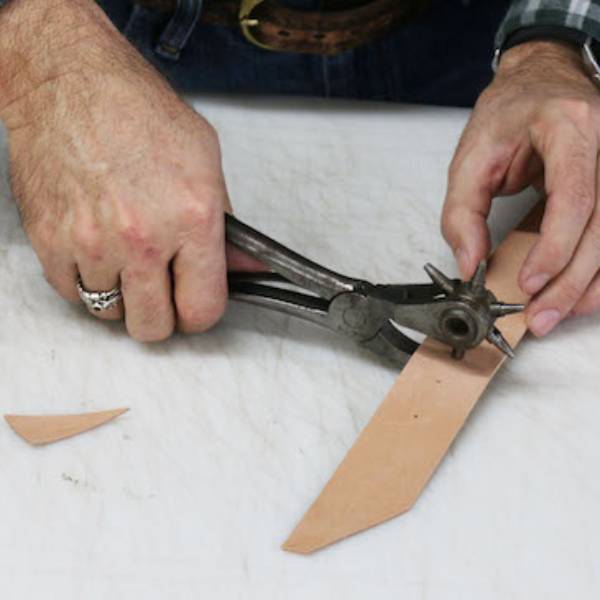
A leather hole punch is perfect for adding new holes to your belt. This tool, known as a revolving punch plier, offers multiple size options. It creates clean and precise holes easily and efficiently.
The use of a leather hole punch ensures your belt hole is the correct size. It also looks professional, like the original ones. If your belt has elongated holes, punch two holes and cut the middle. Always protect your workspace with a cutting board beneath the belt.
A leather hole punch is a good investment if you often adjust your belts. It’s simple to use and the results are consistent. With this tool, you can make perfect holes at home with minimal fuss.
When making a new belt hole, a clean cut is vital. Here are some tips:
Following these tips helps avoid damage. Your belt will look good and last longer. Always remember to work with care.
After adding new holes to your belt, keeping it in good shape is important. Here are simple steps to maintain your customized belt:
By following these care tips, you’ll ensure your belt stays durable and looks great. Regular maintenance goes a long way in extending the life of your belt. It’s worth the effort to protect your investment and keep your customized belt looking its best.